

How To Remove Outlines In Avery Template
Once y'all've selected the blank or pre-designed template you want to utilize for your Avery product, the template volition announced on the Customize screen.
To edit existing text in the template, click directly on the text itself. The Text Tools will open up on the left of the screen. Then click and drag your cursor to highlight the text (or click on the border of the text box) to alter the font style, size and color using the Text Tools. You tin also change the text alignment, add together a new text box or add circular text.
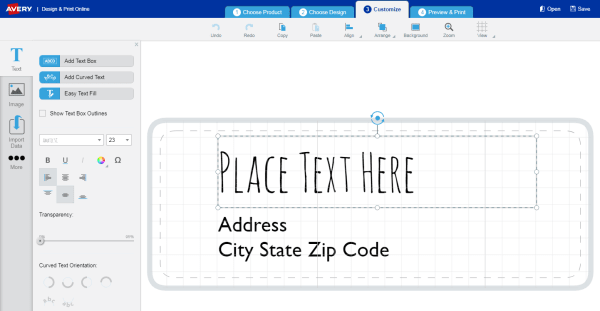
Note: Any changes you brand will appear on all items unless you switch to the Edit One tab in the Navigator on the right side of your screen. A expert idea is to make your formatting changes first using Edit All, and so switch to Edit 1 to personalize text and images on private items. Once you lot make changes to individual items, they won't exist affected by future Edit All changes.
One time you've chosen the blank or pre-designed template yous desire to use for your Avery product, the template will appear on the Customize screen.
To edit existing template images click directly on the paradigm itself and the Text Tools will open on the left of your screen. Now you can add an extra image, replace the existing image, or adjust the colors.
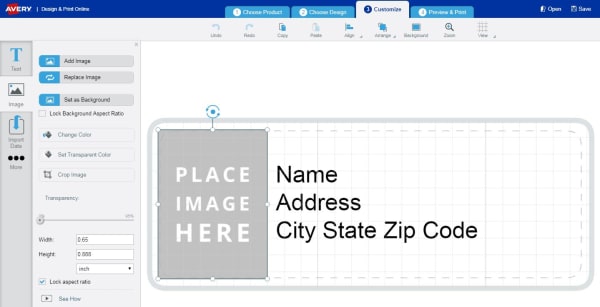
To motion images, click on the image and drag it to the new position. To arrange unlike layers or align items, apply the options in the toolbar at the top of the folio. The Navigator on the correct tin also exist used to select, delete or lock individual items, or to rearrange layers.
Annotation:Whatsoever edits you make will appear on all items unless you switch to the Edit One tab in the Navigator on the right side. A good idea is to make your formatting changes get-go using Edit All, then switch to Edit One to personalize text and images on individual items. Once y'all brand changes to private items, they won't exist affected by hereafter Edit All changes.
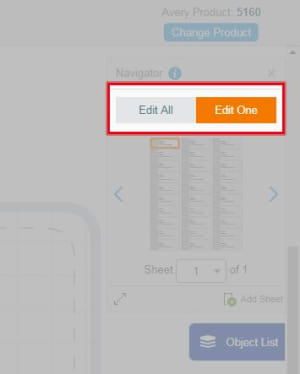
Once yous've opened your template and are on the Customize screen, discover the Navigator located in the upper right corner. Click on the Edit All tab and brand all your formatting, font way and size changes. Then switch to the Edit I tab and click on the individual item you desire to edit. That item volition announced on your screen for editing. One time you lot've fabricated changes to that item, click on the side by side detail you lot want to edit and echo.
Note: Later you've made changes to individual items, if you switch back to the Edit All tab, any changes you brand won't apply to those individual items.
You lot can hands import data from a spreadsheet to create accost labels, proper noun badges, inventory labels and more.
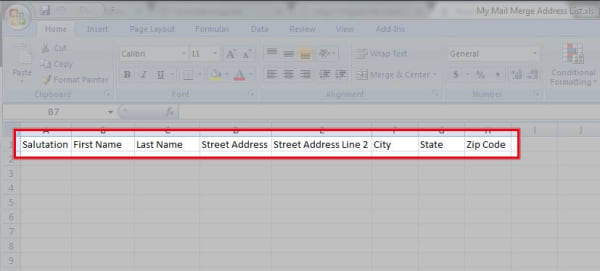
First, brand sure your data is bundled in columns on your spreadsheet (one column for names, one for addresses, etc.). Be certain this data is on Sheet i of your spreadsheet.
Second, open your project in Avery Design & Print Online. Click Import Data on the left of the Customize screen. Then click Browse to find your Excel or CSV file. When your data is displayed, you tin deselect whatever rows y'all don't want printed, such as the header row.
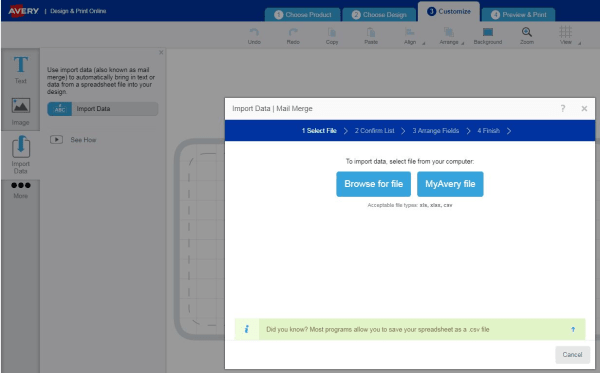
Click Side by side and then double-click or drag and drop data from the Available Fields on the left to the Arrange Fields box on the correct, which represents the text box of your particular. (You lot'll be able to format your text in a later footstep.) One time y'all're washed arranging your fields, click Next and and so click Finish. This volition render you to the Customize screen where yous can make formatting changes.
Note: Whatever changes you make will appear on all items unless y'all switch to the Edit One tab in the Navigator on the right side. A proficient idea is to make your formatting changes first using Edit All, then switch to Edit One to personalize text and images on individual items. One time you make changes to individual items, they won't be afflicted by future Edit All changes
You can easily import data from a spreadsheet to create accost labels, name badges, inventory labels and more.
First, make certain your data is arranged in columns on your spreadsheet (1 column for names, one for addresses, etc). Exist sure this information is on Sheet 1 of your spreadsheet.

In Microsoft® Word click on the Mailings tab at the top of the screen. Click Offset Postal service Merge , and then Step by Step Mail Merge Wizard .
Click on Labels and then click on Next:Starting document .
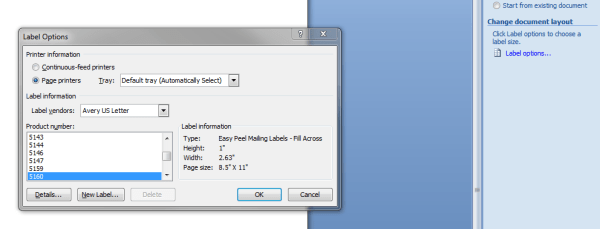
In the Characterization Options window, make sure that:
- Printer Information is set to Folio Printers
- Tray is set to the Default Tray
- Label Vendor is prepare to Avery US Letter
Then click on your product number and click on OK. Then click on Next:Select Recipients .
Cull the choice to use an existing listing and click on Browse . In one case you find and open your database file a window will appear asking to select a table. Exit Sheet 1 and click on OK .
Now you should be able to view your Mail Merge Recipients . Scroll through the options to make sure the data is correct and click on OK. And so at the bottom click on Next:Conform your labels .
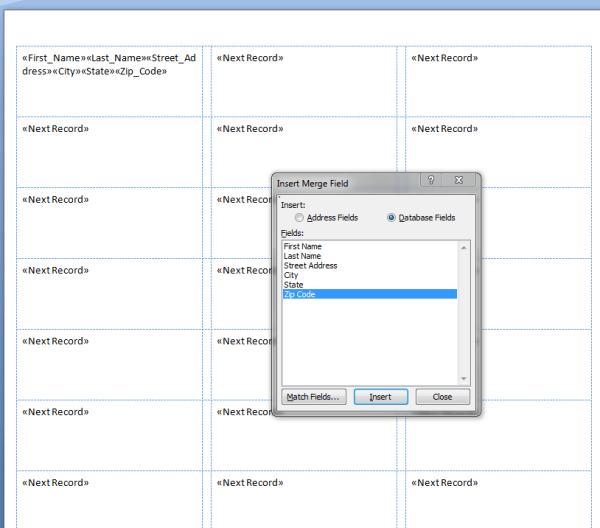
Click on More Items and information technology should open a new window for Insert Merge Field . This is where you will cull which of your columns are merged and in what gild. Click on each field and then click on Insert one at a time . For example, here we volition need to click on First Name and so click Insert, then click on Last Name so Insert, and then on. In one case every field is added, click on Close.
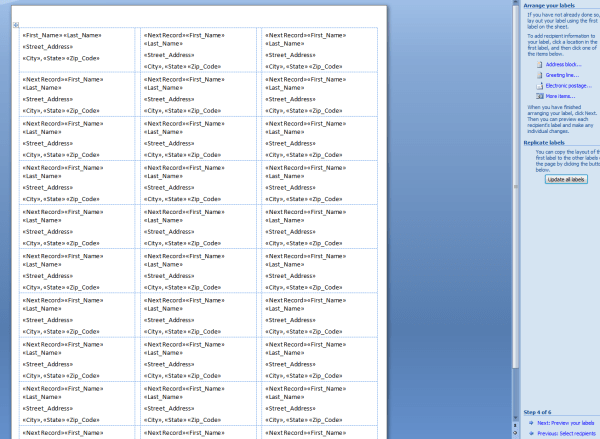
In the showtime characterization, you tin can click betwixt each field to add spaces, line breaks, or any other characters. For instance, we've added spaces betwixt each field, moved the addresses to some other line, and a comma between the City and State. And so click on Update All Labels to apply these changes to the entire sheet. Yous can then click on Adjacent: Preview Your Labels to movement to the next step.
On this footstep you can preview the first sheet. If in that location are any other spaces, line breaks, or characters y'all need to add you can click on Previous: Arrange Your Labels to go back to the previous step and make adjustments. If everything looks right then yous can click on Next: Complete The Merge .
Click on Edit Individual Labels to open the Merge to New Document window . Then make sure that All is selected and click on OK . This should then create the fully merged document.
Please contact our Customer Care Center at (800)462-8379 for more assistance, or telephone call Microsoft® for further assistance at (800)642-7676
To import data from your mobile device's contact list, select a destination text box and tap Start Mail Merge in the tools palette on the left. Tap Contacts. Select the advisable rows and columns of data to import and tap Next. Adapt the data fields to be included in your project by dragging them from left to right. When washed, tap Consummate Merge.

How To Remove Outlines In Avery Template,
Source: https://www.avery.com/help/template-support/customize-template
Posted by: sandersundiers.blogspot.com
0 Response to "How To Remove Outlines In Avery Template"
Post a Comment